Beginner's Guide: How to Use Terra
Learn how to participate in one of the most innovative DeFi ecosystems in crypto.

Key Takeaways
- While still comparatively small, Terra’s DeFi ecosystem boasts one of the most innovative decentralized applications in crypto.
- Terra Station is the go to wallet for users wishing to participate and interact with the network.
- Staking LUNA currently yields over 7% annualized, and the staked asset, bLUNA, can be utilized as collateral for farming yield farming via projects like Anchor.
Share this article
Terra is a smart contract blockchain protocol and payments-focused financial ecosystem powered by algorithmically governed, scalable, and decentralized fiat-pegged stablecoins. Terra’s ecosystem offers an innovative suite of DeFi products, making the protocol worthy of exploration.
About Terra
Launched in January 2018, Terra is a scalable, high-throughput blockchain protocol built on the Cosmos SDK. It uses the Tendermint Delegated-Proof-of-Stake (DPoS) consensus mechanism to guarantee sufficient decentralization while offering low-cost transactions with fast settlement speeds. What sets Terra apart, however, isn’t the high performance of the underlying technology but the thriving ecosystem of innovative and unique user-centric applications built on it.
Decentralized applications like Anchor, Mirror, Pylon, Mars, and Spectrum have unlocked a world of investing and yield farming opportunities on Terra, attracting hundreds of thousands of users and a notable number of developers to the protocol. Additionally, after completing its recent Columbus 5 upgrade, Terra became interoperable with blockchains like Cosmos, Solana, and Polkadot, making its growing ecosystem of DeFi applications more accessible to participants on these blockchains.
Cross-chain interoperability also means more utility and higher demand for Terra’s flagship product—the decentralized, algorithmically governed UST stablecoin. Through bridges like Wormhole and TerraBridge, users can easily move UST between Terra and Ethereum, Binance Smart Chain, and most other blockchains, and use it for various purposes across the multi-chain world.
Creating and Funding a Wallet
Engaging with the Terra ecosystem requires setting up a wallet.
While there are several options to go with, arguably the best one is the Terra Station wallet created by Terraform Labs. It is a non-custodial wallet available as a mobile app, browser extension, and native Windows and iOS application. It offers a similar user experience to MetaMask, albeit it offers fewer features like in-wallet token swaps or NFT support.
Once you’ve downloaded Terra Station from Terra’s official website, follow the few simple steps to create a new wallet. Creating a backup of your Seed Phrase and storing it in a secure, preferably air-gapped environment is paramount here. This is because the Seed Phrase gives you—or anyone else—access to your private key, which in turn provides access to your funds. It’s therefore essential to write down the Seed Phrase on a piece of paper and store it in a safe place, or use a more durable solution such as titanium.
After creating a wallet, you’ll need to fund it with some LUNA tokens. LUNA is Terra’s native staking token used for governance, mining, and a volatility absorption tool for Terra stablecoins that captures rewards through seigniorage and transaction fees. You need LUNA in your wallet to pay for transaction fees. The easiest way to get LUNA is to buy it through a centralized exchange like Binance, Coinbase, Phemex, or FTX. After you’ve done that, simply withdraw the tokens to your Terra Station wallet address, which can be found at the top of the browser extension or your wallet app.
Alternatively, those with funds on Ethereum can purchase a wrapped version of Luna (wLUNA) via Uniswap and transfer it to the Terra Station wallet via the Terra Bridge.
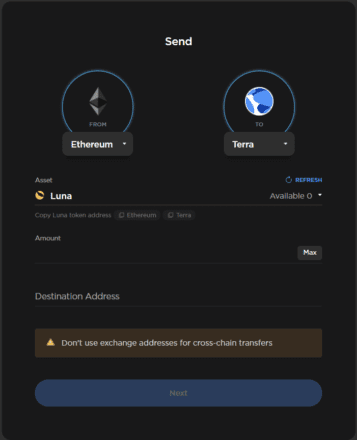
Navigating the Terra Bridge is quite intuitive: connect your Etheruem wallet to Terra Bridge, select the Ethereum network in the “from” dropdown menu on the left-hand side of the app, choose Terra on the right-hand side, select LUNA in the “asset” dropdown, set the amount, paste your Terra Station wallet address in the “destination address,” and click next. Once you’ve approved the transaction in your MetaMask, Terra Bridge will automatically swap wLUNA for LUNA and deposit it to your wallet address on the Terra network. If you have funds on Solana, you can go through the same process to move funds only using the Wormhole Bridge.
Exploring Terra
So you’ve created and funded your wallet, and now you’re wondering where to next.
The first thing you might want to do is put the LUNA you’ve purchased to work by staking it on Terra Station. As Terra is a delegated Proof-of-Stake-based protocol, it relies on a set of 130 validators to verify, clear transactions, and secure the network by running full nodes and committing new blocks to the blockchain. In return for their service, validators and delegators can earn a steady stream of revenue from transaction fees and seigniorage, which currently amounts to roughly 7.07% for delegators and 7.47% for validators.
To become a validator on Terra, users must either bond their LUNA tokens for a minimum of 21 days and be amongst the top 130 largest stakers, or have other users delegate their LUNA stakes. This creates a way for everyone to put their LUNA tokens to work by staking or delegating them to validators, who will then share a portion of the revenue they make with their delegators.
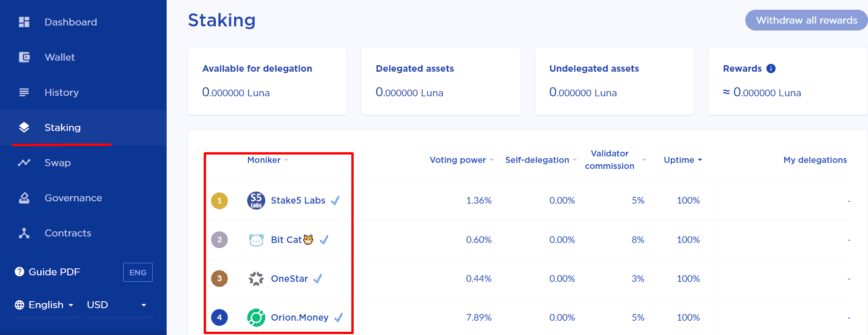
To delegate LUNA, navigate to Terra Station and select “Staking” in the menu on the left side of the page. When you do this, a new dashboard showing a list of available validators will open. After you select the validator of your choice by clicking on their name, another dashboard will open, where you’ll be able to delegate your LUNA by clicking on the “delegate” button.
From here, you’re all set, and your bonded LUNA (bLUNA) will automatically accrue yield. However, if that’s not enough and you want to do more, you can use your bLUNA tokens on the Anchor protocol to earn even more yield by borrowing UST. Anchor pays you to borrow UST with its native ANC token, and the UST can be deposited on the same protocol to earn a fixed 19.49% interest rate.
Borrowing and lending on Anchor is simple. Navigate to the “borrow” page of the app, click on the “borrow” button, set your desired loan-to-value ratio and deposit your bLUNA collateral. Once you’ve done this, you’ll have UST in your wallet, which you can use for whatever you wish, including purchasing other Terra-native tokens on TerraSwap, investing in synthetic stocks or providing liquidity on Mirror, or farming on Spectrum Protocol.
Getting familiar with Terra while the ecosystem is still relatively young and developing can give users a serious edge over the wider market. Some of its decentralized applications like Anchor and Mirror have become successful and big enough to rival even some of Ethereum’s DeFi “blue chips.” Terra experienced a breakout period in 2021, entering the top 10 cryptocurrencies by market cap as LUNA soared to above $100 for the first time. With protocols like Mars, Spar, Loop Finance, and Alice expected to launch in early 2022, Terra is well-positioned to continue on its trajectory and see increased adoption in the future.
Disclosure: At the time of writing, the author of this feature owned ETH and several other cryptocurrencies.
Share this article